Deploying your Full-Stack Webapp in awesome fashion using OCP.

Screen Shot 2017-10-05 at 08.42.22

So lets say you’ve created a cool webapp, and now you are looking to deploy your app to a more permanent environment. For this you can use OCP (Openshift Container Platform) very easily. In short, Openshift is a PAAS solution which allows you to test, deploy and manage your application. All of this is based on containerization using the Kubernetes framework. If you are not familiar with OCP or Kubernetes I encourage you to dive a bit into these topics to understand some of the terms I will be using this post.

In OpenShift you can create entire pipelines for you entire application lifecycle. That is however beyond the scope of this post. In this post we will look at another feature to simply deploy our app using only its source code and S2I. To demonstrate I have created a demo “Tasks” app with a 3 tier architecture.

  1. A client side application created in Angular 4.
  2. An API layer using Spring Boot.
  3. A MongoDB database for data persistence.

You can find the sources for the frontend Angular App here and the sources for the java API here.

To get up and running you first need to get access to an OpenShift instance. The easy way would be to setup an account on Openshift Online. Here you can go for a free starter instance. Alternatively you can install minshift. If you have a Mac, and homebrew you can simply type:

brew cask install minishift

I will be writing the rest of this post based on the assumption you have installed minishift.

To login we need to start minshift:

minishift start

This will start the minishift instance and guide you on how to login. Go to the listed url and login using for example ‘developer/password’. By default the minishift instance allows you to login using any username and password. However the projects you create are only available to the user under which you have created them. You can setup and manage your app as well using a command line tool called ‘oc’. You can make the binary globally available or do this one-off by calling:

eval $(minishift oc-env)

Now you can call for example: “oc login -u system:admin” to login as admin or as developer using “oc login -u developer:password“.

Now that you’ve logged in (using the web console) its time to create a new project. Use the “New project” button to create a new project using the following properties:

Name: tasks
Display name: Tasks project
Description: Another great TODO application

Layer 1: Storage

Immediately you are asked to add something to your project. We are first going to add a MongoDB service to make sure we can persist our tasks. Click on the category “Data Stores” and select “MongoDB” (alternatively you can search for MongoDB directly). As for the defaults keep them that way but set the following properties:

username: dbuser
password: dbpassword
database name: test (I know, very descriptive)

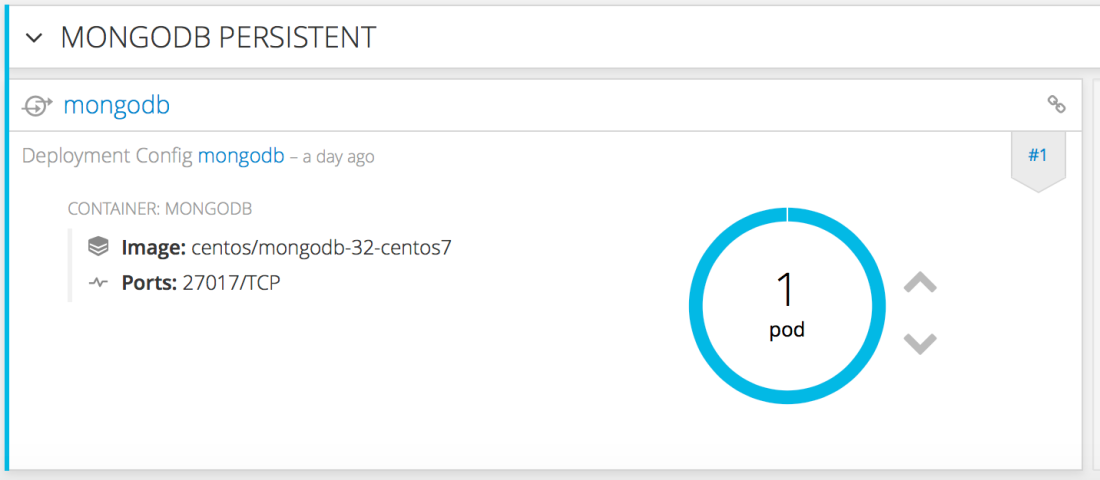
After you’ve clicked on create you can return to the overview and witness the creation of the service and the first pod. This might take a few seconds, but if you see a blue circle, you’re good to go…
Screen Shot 2017-10-05 at 08.44.38
The blue circle of life

Layer 2: API

Lets create our backend api now by clicking “Add to project” in the top menubar. Select “s2i-java”. Call the service “backend” and enter the following git repo url: https://github.com/mhjmaas/tasks-be.git .  Click on advanced and uncheck “Create a route to application”. (Because we don’t want the api to be publicly available). Accept the defaults and click on “Create”.

At this point Openshift will checkout the sources which we provided using the git url. It will then use the s2i-java image to get dependencies from maven repo’s and compile the sources. Then it will push the resulting docker image to its internal repository and use that image to setup a running backend pod. You can simply manually scale up or down by clicking the arrows next to the pod in the overview if you like.

Layer 3: Frontend

Time to setup the frontend. This will be run in a container which uses NGINX to host the Angular application. However there is no builder image for that available in the default Minishift environment. Therefore I have created one myself. There are various ways to get this s2i image. But by far the easiest way is to click “Add to project” in the top menubar, then select the tab “import yaml/json”. Here you can paste a json file containing a resource definition. Go to this url which is the git repo for the s2i-image. Copy the contents of the angular-s2i-nginx.json file and paste it in the “Import yaml/json” field. When you click on create it will download the image from docker hub and install it in your namespace.

Next step: create the frontend service. Once again, click “Add to project”, select “Uncategorized” and select “angular-s2i-nginx”. Provide the name “frontend”, and provide the git url  https://github.com/mhjmaas/tasks-fe.git . Click on create.

Right now the s2i image will use the package.json file to checkout the correct dependencies from npm and then will build the application and publish to the local docker registry.
Screen Shot 2017-10-05 at 08.46.08
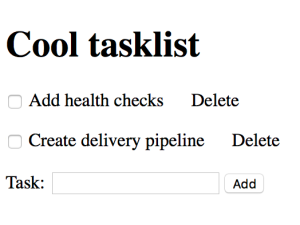
Running instance of our app.

When the build is done, and the pod has been instantiated you can go to the displayed route in the top right of the frontend service. As you can see our app launches and you can add, update and delete tasks. Even if you refresh the page, stop and start the minishift instance your tasks will still be saved. Pretty awesome huh?


What is this dark magic?

Which is what you might be thinking right now… Lets clarify a number of things. First:

How do the pods communicate with each other?

Now this one is interesting. For the backend communication with the database this is quite simple. We have entered a username, password and database name when creating the persistent mongodb service. If you look at the application.properties file in the spring boot backend you can see it references these properties. The url of the database is in this case the service name: mongodb. So if you have changed this to something else you will have issues.

But what about the frontend’s communication with the api? Now this is based on two things. One: there is such thing as an internal hostname in the project you have created for the backend service. You can find it by going to “applications > services > backend”. Here you find the hostname: “backend.tasks.svc”. It will load-balance all incoming traffic over all pods of this service. This hostname is used in part two: NGINX reverse proxy. Have a look at the default.conf file in the tasks-fe repo. Here you see a reverse proxy configuration which uses the hostname we just found. Also this default.conf file is grouped together with a nginx.conf file in a folder “os3/conf”. This is a convention with the s2i-image needs to perform a bit of its magic. It will use the conf files in this folder to overwrite the default ones in the image when it is being created.

So there you have it…

A quick example of how to setup a full stack web app in OpenShift using various technologies in combination with builder images. Every time you push some changes to the git repository you can kick off another build and get running container as a result. If you use a webhook it even will be done fully automatic. Of course this is just the tip of the iceberg. You can add entire pipelines for lifecycle management of your app, add metrics, health checks and more. Feel feel to experiment a bit. I will be back explaining these features in more detail somewhere in the future.

Preventing refresh on MethodIterator in ADF 12c

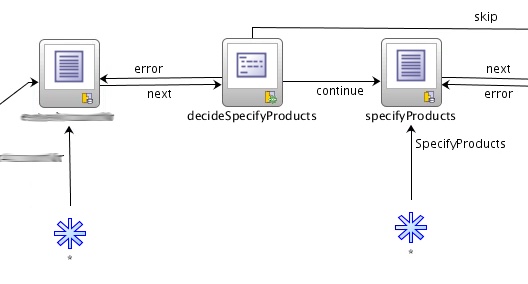
On my current project I have a use case where a list of products needs to be retrieved. This is quite an expensive operation and could take a few seconds. Also, depending on the result I might have to remain on the same page and display an error message, or even skip the page displaying the list of products. This is a repeating process. As you can see below I have created a method call in between pages which does this orchestration. The method is being reused for all these steps.

Application flow

The logic in the method is quite straight forward. It simply executes a methodAction in the pageDefinition, and checks the result to see if the next screen needs to be skipped or not. It also handles errors.

Now at runtime I find that the method is actually being called twice and this is not desirable. After some digging I managed to exclude my code as the culprit. Even before the method is actually being called, the framework calls it for me. However when I navigate back and forth the method gets called only once (which is my method call at work).

So somehow ADF decides to be smart with me and execute the method. (probably because I have declared some variables in the same PageDef connected to this method)

Now in 11g it was quite easy to counter this behaviour. Just set the “Refresh”  property on the methodIterator to “never”. However in 12c this does not work. JDeveloper allows me to set it (using dropdown) but also immediately complains:

Error

Of course I ignored this message and tried to run it with no result. No errors, not warnings, however the method was still being called before I wanted it to. Also, it seems more of the values for the “Refresh” property are disallowed in 12c.  Crap…. what now?

After some more digging and experimenting I have found the refreshCondition to be helpful. The purpose of this value has always been more fine grained control over when iterators are being refreshed. For example, when your page contains an input parameter needed by the service to provide results, you would use the refreshCondition property to only allow the iterator to be refreshed after the parameter has been filled. (eg. refreshCondition=”#{bindings.inputParam.inputValue != null}”)

My solution was to have a boolean indicating whether the method was allowed to be refreshed in the pageflowScope. (any scope greater than request would probably do the trick).

Solution

Now in the methodAction I execute the method as follows:

this.refreshAllowed = true;
List errors = ADFUtils.executeMethodAction(NEXT_PAGE_METHOD, bindings);
this.refreshAllowed = false;

It is quite a nasty way to prevent the method from being called, but it works flawlessly now. Of course I would prefer to have an alternative like the Refresh=”never” setting in 11g. Any clues anyone?

ADF 12C Target tag not working (ZIP_STATE_FAILED)

Recently I found out that the highly usefull af:target tag did not work for me in my project. At first glance it seemed to simply do nothing however after consulting the logs I found the following exception:

java.lang.RuntimeException: ZIP_STATE_FAILED at org.apache.myfaces.trinidadinternal.application.StateManagerImpl$PageState._zipToBytes(StateManagerImpl.java:1738)
at org.apache.myfaces.trinidadinternal.application.StateManagerImpl$PageState.<init>(StateManagerImpl.java:1514)
at org.apache.myfaces.trinidadinternal.application.StateManagerImpl._saveStateToCache(StateManagerImpl.java:356)
at org.apache.myfaces.trinidadinternal.application.StateManagerImpl.saveView(StateManagerImpl.java:230)
at com.sun.faces.application.view.WriteBehindStateWriter.flushToWriter(WriteBehindStateWriter.java:225)
Truncated. see log file for complete stacktrace
Caused By: java.io.NotSerializableException: oracle.adf.view.rich.event.Target
at java.io.ObjectOutputStream.writeObject0(ObjectOutputStream.java:1183)
at java.io.ObjectOutputStream.writeObject(ObjectOutputStream.java:347)
at java.util.ArrayList.writeObject(ArrayList.java:742)
at sun.reflect.GeneratedMethodAccessor944.invoke(Unknown Source)
at sun.reflect.DelegatingMethodAccessorImpl.invoke(DelegatingMethodAccessorImpl.java:43)
Truncated. see log file for complete stacktrace

After some digging I found this is because of the “org.apache.myfaces.trinidad.COMPRESS_VIEW_STATE” context parameter. The framework is unable to serialize the “oracle.adf.view.rich.Target” class when it tries to compress it. I filed a service request with Oracle and the bug has been recognised. However, for now the quick fix is to simply set the “org.apache.myfaces.trinidad.COMPRESS_VIEW_STATE” context parameter to “false” in the web.xml. Now the tag works as expected.

Update: After talking to oracle support they claim the property is not supposed to be a “true/false” but a “on/off” value.  When setting the property to “on” or “off” the problem seems solved, however I am personally not sure whether the compression actually is enabled. Also when Jdeveloper generates the property it is also a “true/false” value…

Hope this might help you on your upcoming ADF 12C endeavours!

Until next time

Screenflows with BPM and ADF 12c

BPM 12c came with a slew of features that were scrapped when Oracle truly integrated the acquired BEA’s BPM implementation. One of those features is “screenflows”. I guess some of you, if not all of you have ever come across the situation where you needed to retrieve some information from a user using a human task, then do some logic and immediately provide the same user with a new screen for processing this data without having to go back to the tasklist.

In 11g there was no (out-of-the-box) way to do so, other than using the human workflow api or simply doing a service call from the existing task flow and not really going back to the process. Well now you can! And we are going to demonstrate it in this post. Now this feature is easily configured. We first need to make sure the server is configured correctly. Because this feature uses JMS messaging to function we need to a new topic as well as a new connection factory.

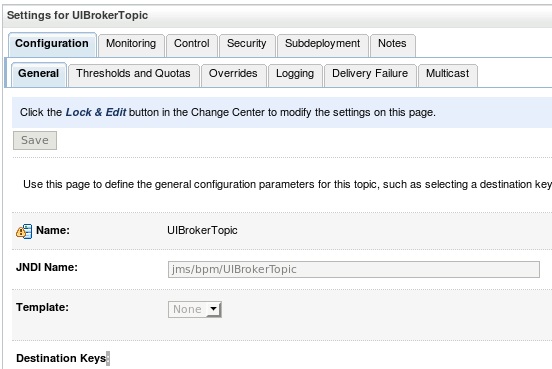
In WLS console in BpmModule create a new topic:

Topic

Name: UIBrokerTopic
JNDI Name: jms/bpm/UIBrokerTopic
Type: Topic (or Distributed unified Topic if clustered)

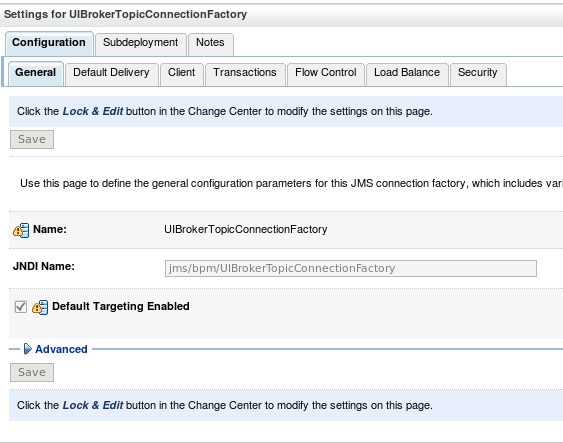
Create a new connection factory:

ConnectionFactory

Name: UIBrokerTopicConnectionFactory
JNDI Name: jms/bpm/UIBrokerTopicConnectionFactory
Type: Connection factory Last step in configuration is the enablement of the process broker in the Enterprise Manager.

Therefore navigate to the following MBean:

mbeans

oracle.as.soainfra.config> BPMNConfig > DisableProcessBroker and set it to “false“.

Restart your managed servers.

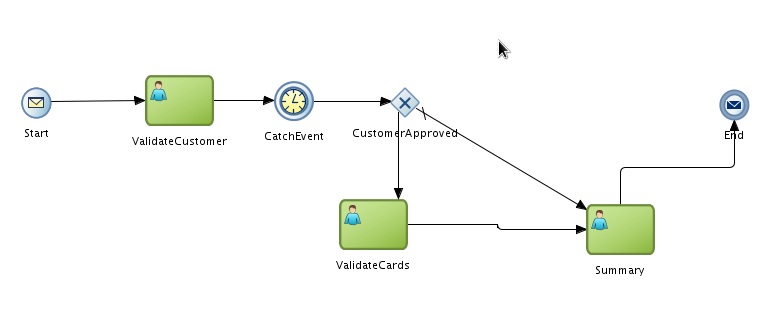
So now we can actually develop a BPM process with a number of sequential user interactions. In between these user interactions we can do some logic to define which user interaction needs to be displayed next. What we want to happen when running this process and testing it using the EM and BPM Workspace is to see the various task screens popup automatically after we have finished the current task, without having to return to the task list.

flow

All the configuration to make this work is done in the ADF Taskflow. Specifically in the hwtaskflow.xml file. I presume that we have created these task flows either manually or by using the wizard. We need to declare whether we want the task flow to wait for a new screen to popup or not. We can do this by adding the “ScreenFlowMode” element to the task flow definition and setting it to “true”. It does not matter which user interaction will come up next, as long as it is for the same user it will be shown to the user.

However it seems that at least for now you  need to mark the last user interaction in the flow with “ScreenFlowMode= false” to make sure you return to the task list immediately after finishing this task. Otherwise the human task engine will make you wait for 10 to 12 seconds before returning to the tasklist. This wait time seems to be the timeout for the screenflow mode. This can be a positive as well as a negative. It means when your server is overloaded and processing takes too long, you will be returned to the tasklist. The positive here is that you can always pick up where you left off.

There is still lots of stuff I do not know about screenflow mode. This is both technical and functional. When to use ScreenFlowMode or when to simply combine multiple screens in an ADF taskflow. Also the exact technical details of how ScreenFlowMode works I do not know just yet… I will update this post over time when I find out more.

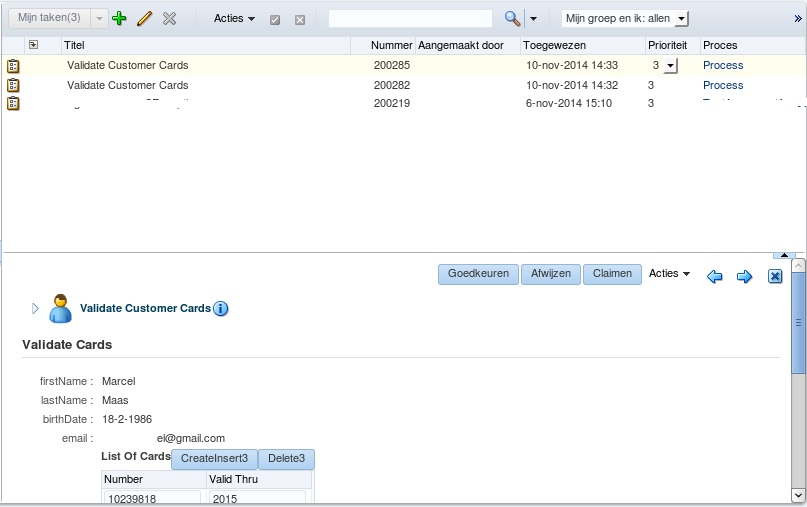
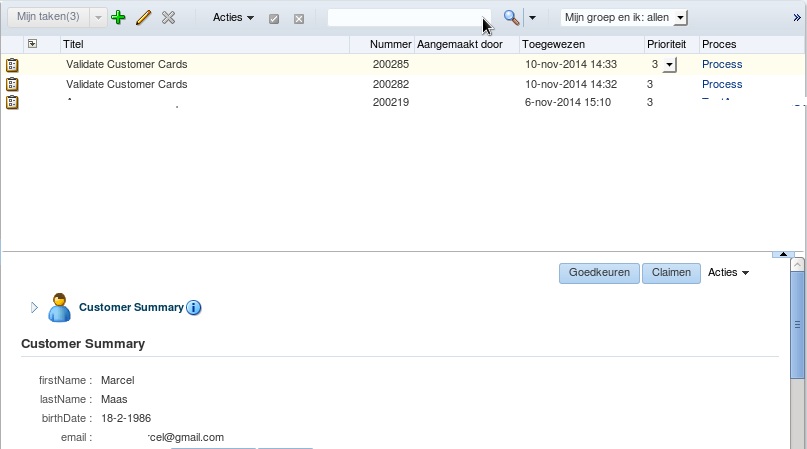
Lets go back to the screens. After deploying the BPM process as well as the 3 ADF taskflows we can test if the screenflow works. Start a test case and open the worklist. When you finish a task it immediately jumps to the next without going back to the tasklist. Hooray!

validateCards

After clicking an outcome, we immediately get to see the summary screen:

summary

So thats it for today, feel free to comment!

Update:

So I now have some extra information about the inner workings of this feature. As it turns out the topic is used to notify the human workflow engine of the next screen in the flow. So when the BPM Process engine encounters a new User Interaction it will post a message on the topic which is then supposedly the trigger for the Human Workflow Eninge to display the accompanying taskflow.

Now there are a couple of pro’s and con’s to the screenflow engine as it is right now. (Release 12.1.3)

Pro’s:

– A screenflow is not confined to the contents of a single BPM process / instance. It can continue into subflows or other proces instances, as long as it is for the same user of course and there is no marked end. (using ScreenFlowMode = false)

– You can always pick up where you left when you closed the browser since they actually are individual tasks. (and transactions)

– A screenflow works with any BPM process and needs no design time specific configuration. Only the ADF Taskflow needs this configuration (ADF Taskflows should be separated from the process anyway)

Con’s:

– There is no configurable timeout for the screenflow. It is now set for 10 seconds. From a UI designers perspective this is more than enough, since I really dont want any user to wait for more than 10 seconds before the screen pops up. Update: A patch has been released for this con. (20361155) It allows you to set the timeout in the preferences pane of the worklist application.

– Design-time declaration of which user interaction is the last one in the screenflow. I can foresee situations where it is not clear which wil be the last user interaction in the flow because of business logic. Also the declaration of which interaction is the last one in the flow is done in the ADF View layer which seems weird because you are actually putting a bit of business logic there as well.

– It’s a quite hidden feature,  I have a feeling this will improve over time.

In my opinion it would be great if we could add the possibility to mark a dynamic screenflow start and end in BPM so the view layer could remain nicely ignorant of business logic. Also I have a feeling this feature will become easier to configure and use in future releases…

Error: ADF_FACES-30200: The UIViewRoot is null.

Have you ever encountered this one?

Error

It might be a number of things, invalid EL expression, invalid cpx files or calling a page which cannot be found. Now I have found another reason why this might happen and has got everything to do with being unable to find a page referenced in a task flow.

It came with a huge exception stack, including the following lines:

… java.lang.RuntimeException: java.lang.Exception: MDSLockedSessionManager already registered. Can’t register more than one.

 java.lang.NullPointerException
at oracle.adfinternal.controller.faces.context.JSFRequestMapAdapter.getRequestMap(JSFRequestMapAdapter.java:29)

Which is not very descriptive. However I have found this turned out to be another case of “Canot find the page which is referenced in the task flow”. Consider the following two screenshots:

Without slash

As you can see, all is well, at least as far as JDeveloper is concerned. The issue here was with the page attribute. It needed to have a preceding slash as you can see below.

With slash

Now the page was running fine. So beware, JDeveloper does not give you any warnings about this and it kept me busy for quite a while before I found out the solution.

I really hope it helps you as well.

Until next time!

Missing your data controls?

When using JDeveloper have you ever had a situation where your data controls are missing from the “Data Controls” pane? Even though you have data control definitions in your project? Well I have and took some time finding out why.

My adfm.xml file was in the project as well as the necessary DataControls.dcx. After some digging I found out that my JDeveloper was not configured to even look for Data Controls. This was remedied quite easily.

After right-clicking and going to properties navigate to “ADF Model” simply select the “Contains Data Controls” checkbox and you are ready to “Drag and drop” again.

Data Control

Well there you go, I might just have saved you some precious time.

Chatzi: A chat app using Web Sockets

In my last post we created a chat server application for Weblogic 12c. A chat server is only useful when you have an application who makes use of the chat service. And that is exactly what we are going to do in this post.

These days there are very few applications that are created without some sort of framework, or multiple frameworks. Thats why we will use a number of frameworks as well for our chat application. In our case this will be AngularJS for application logic and data binding combined with Bootstrap for the user interface.  AngularJS is very popular and when you combine angular with a number of tools you can be extremely productive. In our case we will use Yeoman, Bower and Grunt to support our development. Yeoman does scaffolding, while bower manages packages. Grunt is a powerful task runner which can do things as act like a javascript web server, run automated testing as well as building and packaging your app. How they exactly work is beyond the scope of this blog. However this article is an interesting read if you want to know more about them. (and you really should if you are considering using AngularJS).

Also we have included ui.bootstrap directives which make it easy for AngularJS to interact with the Bootstrap components. Finally we are using ngSocket to provide an easy interface to Web Sockets.

To be clear, this post is not a tutorial on how to start working with AngularJS or any of the other frameworks involved. It is intended to show you how to use the strengths of various frameworks to quickly develop an entire application.

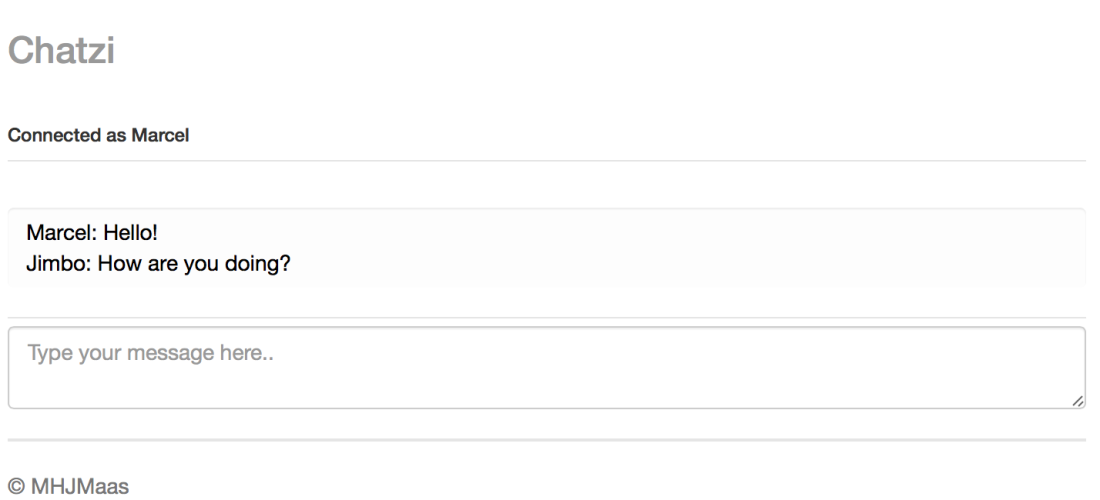
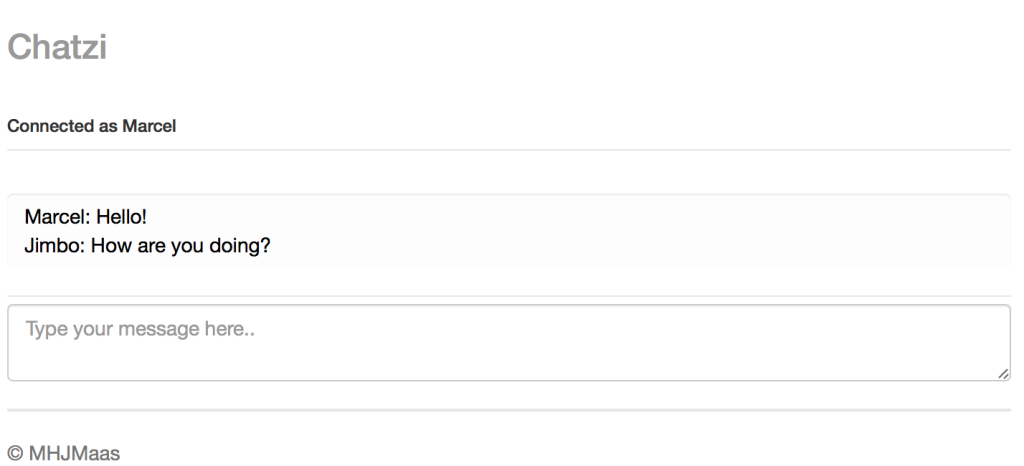
Ok, so lets get back to our app. It is called Chatzi and it is a really simple app with the potential of becoming great. It allows everyone who accesses it to enter a username and start chatting in one big chatroom. The interface looks as such:

Chatzi

The interface which you see here is made using the bootstrap framework. This saves us some time thinking about responsive design as well as the initial styling. It also gives us some components such as Modal popups. We sort of got this for free when we kickstarted our project with the (Yeoman) command:

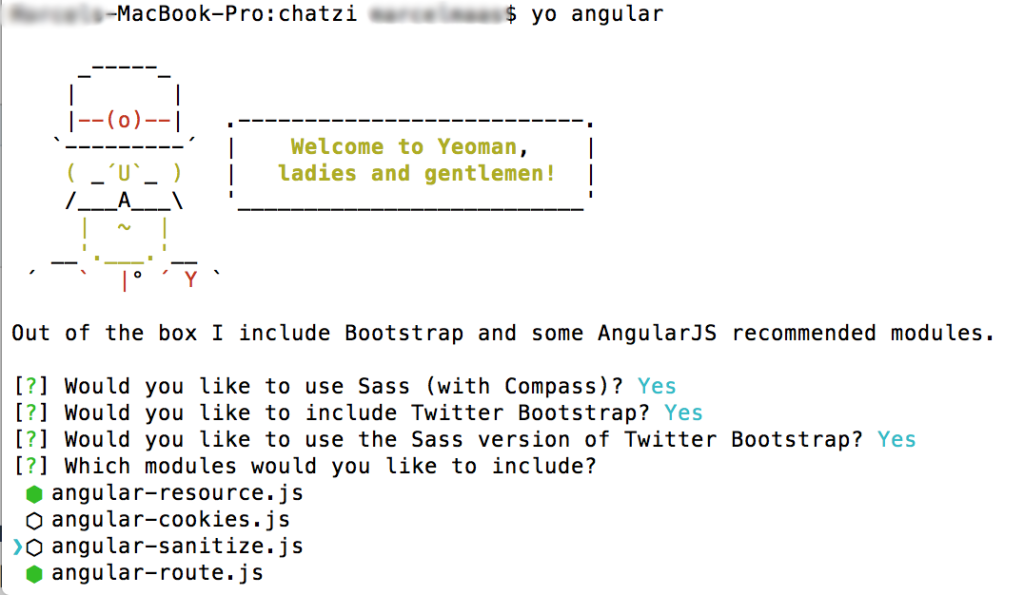
“yo angular”

Yeoman

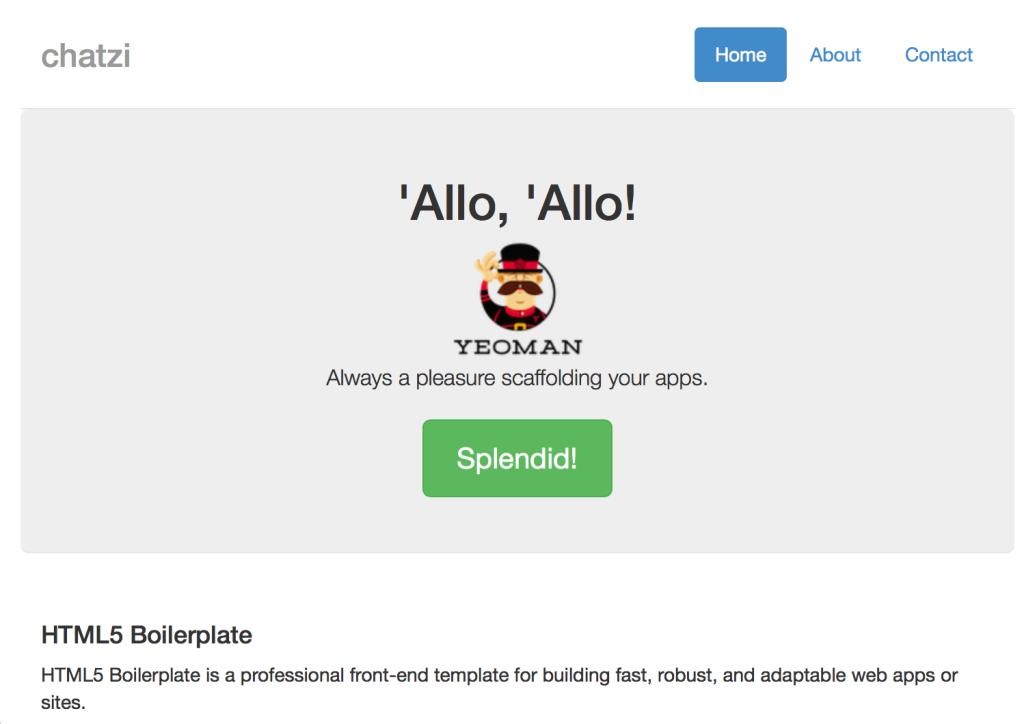
Yeoman then creates our project in the current directory and sets up Bower and Grunt as well. So what we have now is a fully fledged application which does absolutely nothing. We can run it using the command “grunt serve” which will start a javascript server and launch your browser with your application.

This is what an application kickstarted with yeoman looks like initially

Notice the responsive design when you resize the browser window. We did absolutely nothing to facilitate this. This is Bootstrap at work, you can read all about it here. Now we can modify the html code in the “views/main.html” to suit our needs. You will need to know something about the style classes bootstrap uses but for the rest it is mostly self explanatory.


<div class="header">
  <h3 class="text-muted">Chatzi</h3>
  <h6>{{connectionStatus}}</h6>
</div>

<div class="messages-panel">
    <textarea id="messages-area" ng-model="messages" readonly class="form-control"></textarea>
</div>
<div class="input-panel">
    <textarea id="input-field" ng-model="message" class="form-control" placeholder="Type your message here.." ng-enter="sendMsg()"></textarea>
</div>

<div class="footer">
  <p>© MHJMaas</p>
</div>

<script type="text/ng-template" id="myModalContent.html">
    <div class="modal-header">
        <h3 class="modal-title">Welcom to Chatzi, what is your name?</h3>
    </div>
    <div class="modal-body">
        <form role="form" name="nameForm">
            <input name="name" placeholder="Your username here..." type="text" required="true" ng-maxlength="50" ng-minlength="2" ng-model="name" class="form-control" ng-enter="ok(name)"/><br/>
        </form>
        <br/>
        You chose: <b>{{ name }}</b>
    </div>
    <div class="modal-footer">
        <button class="btn btn-primary" ng-click="ok(name)" ng-disabled="!nameForm.name.$valid">OK</button>
    </div>
</script>

Now lets have a look at this html code. The first parts make up the screen. As you can see we display the connection status in the header using AngularJS bindings using the brackets syntax. Whenever we change the “connectionStatus” variable in the scope, the value is automagically updated in the view.

On to the “messages-panel”. Here we display received chat messages. Notice the use of the “ngModel” directive. This does essentially the same as the bracket syntax which is bind to the messages variable on the scope. The “input-panel”  directly below contains the text-area which allows us to actually send message. We have created a custom directive to submit the message when we press the enter key. Also note the use of the ng-model binding again.

Finally at the bottom is a custom template for the modal popup which will be instantiated using the ui.bootstrap.modal directive  with its own scope as you will see in the next part of this blog.

So, on to the code. This is where it all comes together. Lets take it step by step.


// Please note that $modalInstance represents a modal window (instance) dependency.
var ModalInstanceCtrl = function ($scope, $modalInstance) {

  // Close the modal while returning the name
  $scope.ok = function (name) {
    $modalInstance.close(name);
  };

};

This part contains the controller and scope which is linked to the “myModelContent.html” template we have seen before in the view. Its functionality is quite simple, it has only one method which returns the name back to the calling controller. The “ok” method is called from the template which passes in the entered name because it was made available on the scope by the “ng-model=’name'” declaration.

Now lets move on to the instantiation of the main controller:

angular.module('chatappApp')
  .controller('MainCtrl', function ($scope, $modal, $log, ngSocket) {
    $scope.username = null;
    $scope.connectionStatus = 'Disconnected';

    var ws; // reference to the websocket connection
    var messagesArea = document.getElementById('messages-area'); // reference to the messages textarea

We simply create a number of variables on the main scope to save the username and set the connectionStatus. Also we get some references we will reuse.

As soon as we have started the application we want to check if we have username available. If not we want to ask for a username and launch the modal popup. The following code does exactly that.

    if ($scope.username === null){
      $scope.open('sm');
    }

Whoa! Where does this open function come from all of a sudden? Well, we defined it and it contains quite a lot of logic. Here it is:

// Opens the modal of a specified size
    $scope.open = function (size) {
      var modalInstance = $modal.open({
        templateUrl: 'myModalContent.html',
        controller: ModalInstanceCtrl,
        backdrop: 'static',
        size: size
      });

      // when the modal is closed using the &amp;quot;OK&amp;quot; button
      modalInstance.result.then(function (name) {
        // save the username and set the status
        $scope.username = name;
        $scope.connectionStatus = 'Connecting...';

        //Open a WebSocket connection, change this url to point to your chatserver
        ws = ngSocket('ws://localhost:7101/chat/server');

        // this method resizes the messages textarea to make sure all of the content fits
        // If not this method makes sure it uses the entire screen and scrolls to bottom to see the latest messages
        function resize () {
          // save the old height in case we need it later
          var oldHeight = messagesArea.style.height;

          // set the height of the textarea to match the height of the content
          messagesArea.style.height = 'auto';
          messagesArea.style.height = messagesArea.scrollHeight+'px';

          // if the height of the body exceeds the height of the window, then use the old height which should be an exact fit
          if (document.body.clientHeight &amp;gt; window.innerHeight){
            messagesArea.style.height = oldHeight;
          }

          // and scroll to the bottom
          messagesArea.scrollTop = messagesArea.scrollHeight;
        }
        /* 0-timeout to get the already changed text */
        function delayedResize () {
          // this is to make sure the text was added before we calculate height
          window.setTimeout(resize, 0);
        }


        // This function is called when a message is returned from the server. Of course this is a simple implementation
        // of a protocol which you can expand on.
        ws.onMessage(function (msg) {
          // check what the message means
          if (msg.data === 'connection accepted'){
            $scope.connectionStatus = 'Connected as ' + $scope.username;
          } else {
            // its a chat message. msg.data is a json string so parse it before we can use it.
            var data = angular.fromJson(msg.data);
            if ($scope.messages === undefined) {
              $scope.messages = data.message;
            } else {
              $scope.messages = $scope.messages + '\n' + data.message;
            }
            delayedResize(); // resize the messages area to fit the content.

          }
        });


      });
    };

Lets take it from the top. The first part opens the modal using the specified html template as well as controller. Note the ‘backdrop: static’ declaration. This makes sure the modal can only be dismissed using a button, and not by clicking outside of it. Because we really need a username! Next up is the code that handles the dismissal of the modal using a username. We will then save the username on the scope and start the WebSocket connection using the URL we defined in the ChatServer Application from our previous blog post.

The resize function makes sure the messages text-area gets the correct size for displaying all of the chat messages. The comments will be sufficient for you to understand what is going on.

As you can see we will handle received chat messages by adding them to the messages variable and then call the resize method after a delay. This is a hack to allow the website to render first so we can get the actual height including the just received message.

Pfew… that’s it right? Oh wait, we still need to send chat messages as well. Luckily this is done quite easily. Consider the following piece of code:

    $scope.sendMsg = function(){
      ws.send($scope.username + ': ' + $scope.message);
      $scope.message = '';
    };

It’s that easy. Lets not forget to empty the message variable so that we can immediately start typing our next message. The final component is the directive to detect the pressing of the “enter” key.

.directive('ngEnter', function() {
    // This directive detects an enter keystroke and calls the specified function
    return function(scope, element, attrs) {
      element.bind('keydown keypress', function(event) {
        if(event.which === 13) {
          scope.$apply(function(){
            scope.$eval(attrs.ngEnter, {'event': event});
          });

          event.preventDefault();
        }
      });
    };
  });

This is very specific code for the AngularJS Framework. I suggest you dive into AngularJS directives to really understand this code. The main part here is the fact that we listen to the keydown and keypress events. When the keycode is 13 (where 13 = enter) we simple call the specified method in the template.

So there you are. Run the command “Grunt serve” if you havent already and start chatting. You can see how instantly the chat messages get broadcasted by using two different browsers side by side. This is possible because of the live connection the server and because the server pushes the messages in real-time.

Of course you can find the entire project right here. You need to run the commands “npm update” and “bower update” from the directory before you can all “grunt serve” to get all the packages needed to run the application.

Now there is a lot that can be improved in this application, such as remembering of your username as well as a list of connected clients and perhaps some color to make it easy to identify everyone… I might just write some posts about that as well, so stay tuned!

Until next time!

Implementing a simple chat server using WebSockets on Weblogic 12.1.3

Since Weblogic 12.1.2 it is possible to use WebSockets in your web applications. I thought I would give this a try. In my case I am using Weblogic 12.1.3.

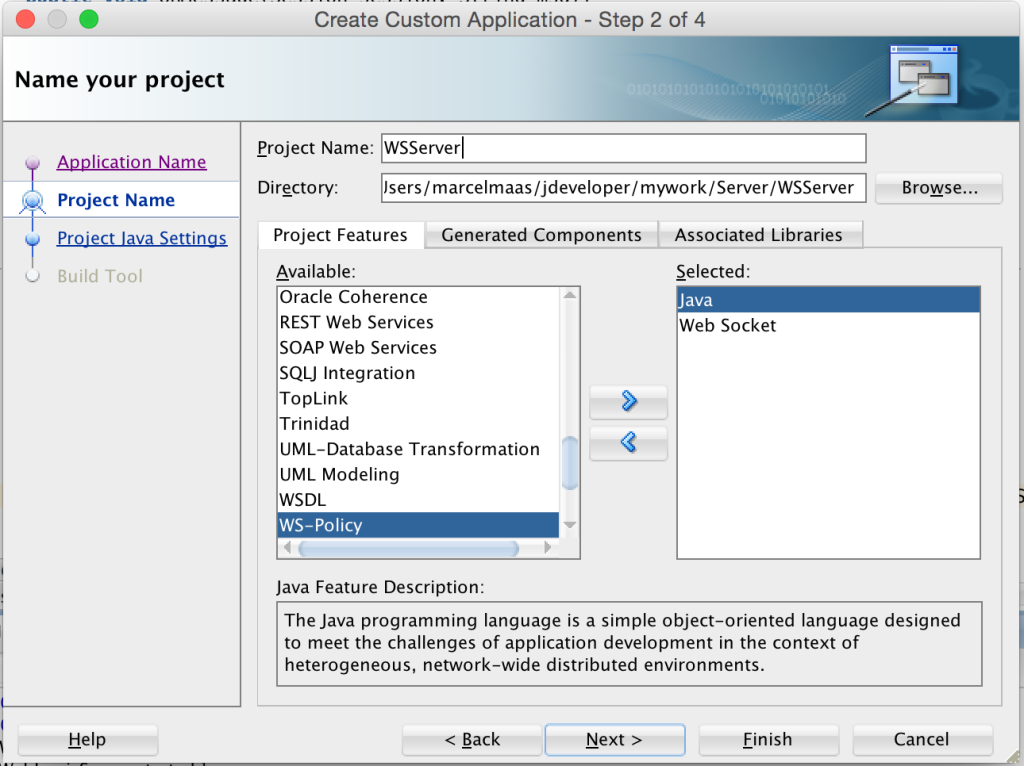
In this case I am using vanilla java 7 to create a server application with JDeveloper. Use the gallery to create a new custom application. When asked, create a project with Web Socket technology.

Using the websocket and java technologies for the project WSServer

After setting my default package I choose the defaults and finish creating the project. Now add a simple java class. I conveniently called it “ChatEndpoint”. Add the annotation “ServerEndpoint” which will define the url of your websocket connection. This will become a combination with the context root of the web application. More on this later.

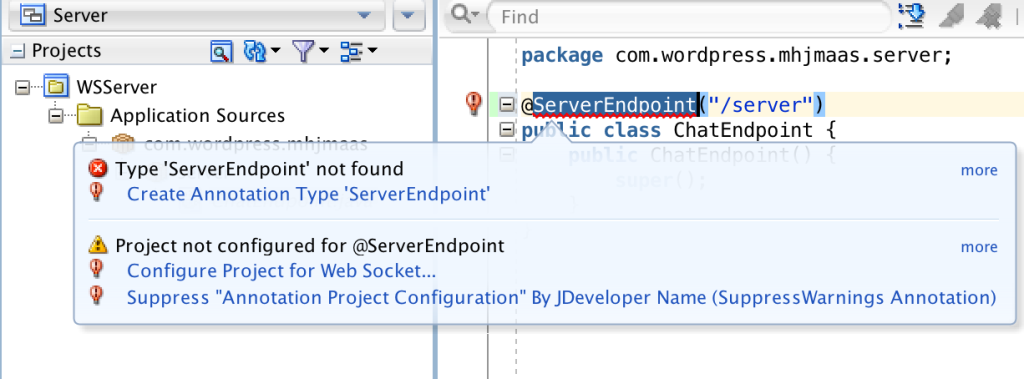
JDeveloper will display an error on the “ServerEndpoint”. When hovering over this error JDeveloper will tell you the project is not correctly configured. Let JDeveloper fix this by clicking on the “Configure project for Web Socket” link. Import the annotation as well.

The project before the WebSocket configuration
The project after the WebSocket configuration

As you can see the project has now been correctly configured as a WebSocket project. JDeveloper has added a web.xml and designated the “ChatEndpoint” as a service.

Now we need to implement the necessary methods to connect and disconnect a client as well as the handling of actual chatmessages.

First we add the method which will accept incoming client connections. We want to be able to confirm the connection to the client so we will send a message to the client when the connection has been made.

    @OnOpen
    public void onOpen(Session session, EndpointConfig conf){
        try {
            session.getBasicRemote().sendText("connection accepted"); 
            System.out.println("Currently connected clients: " + session.getOpenSessions().size());
        } catch (IOException e){
            e.printStackTrace();
        }
    }

Now the real magic is of course when we want to relay the message to all clients. Consider the following piece of code.

    @OnMessage
    public void onMessage(Session session, String msg){
        try {
            for  (Session sess : session.getOpenSessions()){
                if (sess.isOpen()){
                    sess.getBasicRemote().sendText(msg);
                }
            }
        } catch (IOException e){
            e.printStackTrace();
        }
    }

As you can see this is a really easy piece of code. The onMessage method gets called when a client sends a message to the endpoint. The session object has a way to retrieve all currently connected clients. So we use this to get all the clients and send the message we just received to all clients.

Finally we need some code to handle the closing of connections.

    @OnClose
    public void onClose(Session session, CloseReason reason) {
        try {
            System.out.println("Connection closed, remaining connections: " + session.getOpenSessions().size());
            session.getBasicRemote().sendText("Connection closed");
            session.close();
        } catch (IOException e) {
            e.printStackTrace();
        }
    }

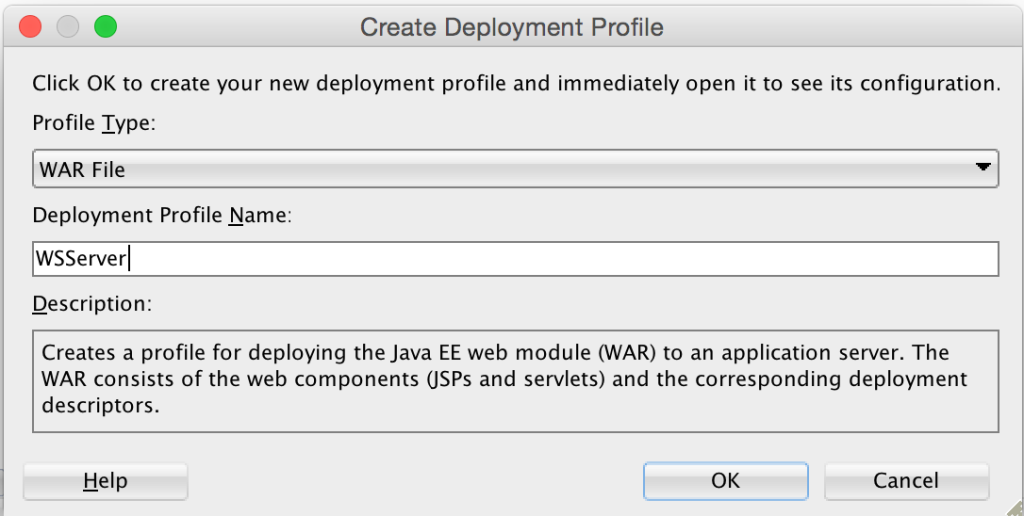
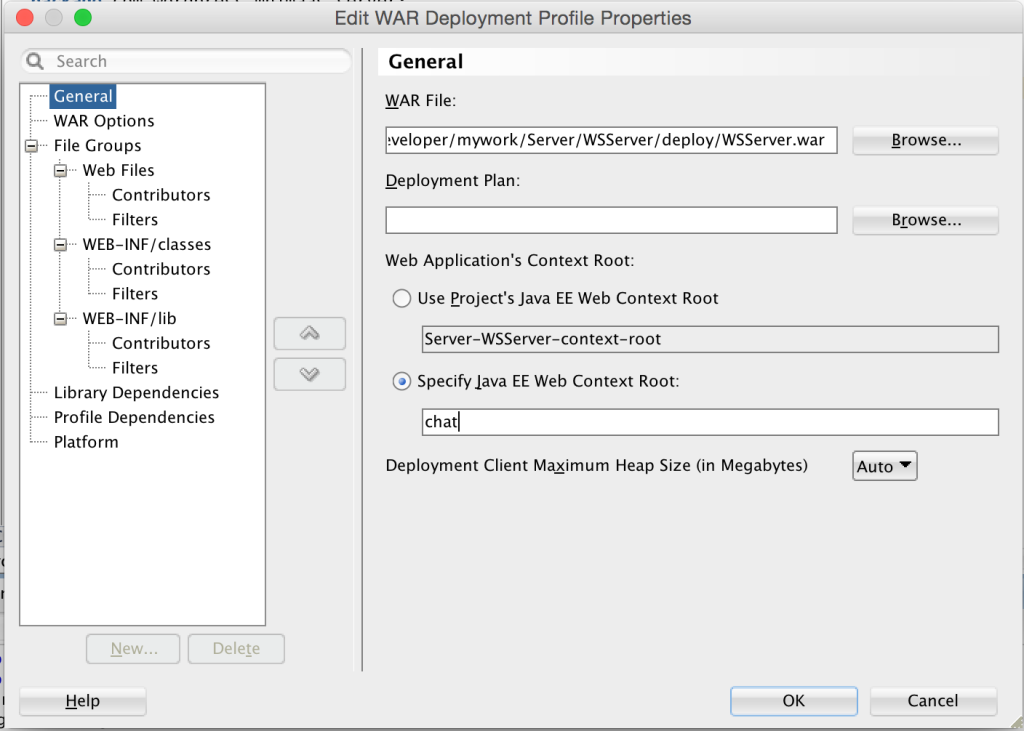
Wow, that was really easy. The last thing to do here is of course to deploy to the server. Therefore we need to create a deployment profile. To do so right click on the “WSServer” project and choose “Deploy” -> “New deployment profile”. Select “War file” and give it a decent name.

Creating the deployment profile

Now the only thing to take notice of right now is the “Web application context root”. By default JDeveloper makes one up for you which is utterly user unfriendly. I usually specify my own here.

Specify your own web context root. Right here it is "chat"
Specify your own web context root. Right here it is “chat”

To get your websocket connection url you must append this context root to your specified endpoint. In our case this will become something like:

ws://localhost:7101/chat/server

Thats it. You can now rightclick the project and deploy to the integrated weblogic server to test your WebSocket chat server. Of course we need a client for this. In the next post we will create a chat client using AngularJS.

See you next time.

Oh, and of course the JDeveloper Project

Welcome to my blog

Hi there!

My name is Marcel Maas and I will use this blog to write about all sorts of subjects that have something to do with Oracle ADF, HTML5, CSS, Javascript and much more. I might just throw in a bit of SOA as well.

This variety of subjects stems from my line of work. I work for a company called Rubix my area of expertise there lies with font-end development with ADF as well as process integration using Oracle BPM. On the more personal end my passion lies with creating a great user experience for a user using the tools available. This means heavy use of new HTML5 concepts, CSS3 and Javascripting.

In the workplace I try to combine all of these into making great products for customers. And on this blog you will find out how to do so as well.

So happy readings!

Greetings,

Marcel